Vulcan Reference Manual

  • Welcome to Vulcan Control
  • Introduction
    • User interface
    • Workflow
    • Machine Operation
    • Control panel
  • Production Workflow
    • Preparation
    • Create
    • File Management
    • Select Program
    • Edit NC Code
    • Edit Laser Technology
    • Edit layout
    • Simulation run
    • Work offsets
    • Run
    • Re-entry
  • Laser Technology Tables (LTT)
    • Terminology
    • Laser Data items
      • Piercing
      • Multistage Piercing
      • Cutting
      • Special Processes
    • Modifying Laser Data
    • LTT Management
    • Ramp Cycles
    • FlyLine
    • Acceleration control (DCA)
  • Technology functions
    • Vaporize Sheet
    • Nanojoints
    • PierceLine Sensor
    • Frog Jumping
    • Cutting Tools
  • Controls
    • Lubrication Cycle
    • Protective Glass Monitoring
    • Scrap Cut
    • Go To Sheet Origin
    • Height Sensor Calibration
    • Nozzle Centre
    • Target Shot
    • Gas Purge
    • HC Manual Set Point
    • Go To Park Position
    • Nozzle Clean & Height Sensor Calibration
    • Edge Detection
    • Focus Comb
    • Focal Distance
    • Pilot Diode Positioning
  • Production plan
    • Create a production plan
    • Modification
    • Run a production plan
    • Running sequence
    • sheet loading
    • Material stock
  • Drop and Cut
  • Troubleshooting
    • Frequent collisions
    • Work offset
    • Extreme small contours
  • NC Programming Reference
    • DIN format
      • DIN Program Structure
        • Program Number %
        • Block number N
        • G-functions
        • M-functions
        • Parameter Array
        • Graphical Element – Display Marker Lines
      • Laser Technology
        • Program Header
        • Technology Table (TT) Transfer
        • Check for Bound Program Active
        • Block Jump
        • Block Number
        • Start of a Part information
        • Laser parameters selection & Update
        • Contour Statements
        • Program End (G99)
        • Remnant Cut
          • Start Remnant Cut
          • End Remnant Cut
        • FlyLine
        • Only Piercing in the Contour
        • Nano Joints
        • Sample Program with Multiple Parts
        • Fly Cut Sample Program:
    • LST format
      • LST Program Structure
      • FlyLine
      • TC_WRITE
      • Incremental Command (IC)
      • Soft Micro-Joints & Nano-Joints
    • Laser Technology commands
      • Laser cutting
      • Identifying parts
      • Multiple program structure
      • Cutting distance
      • Kerf correction
      • Overshoot height
      • Timing of parts
      • Bevel cut
      • Beam suppression
      • Flying focus position alteration
  • Impressum
Production Workflow
/
Work offsets

Work offsets

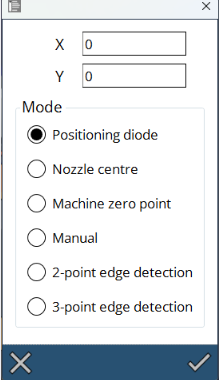
The machine could determine the work offset in multiple ways.
WO

Position diode

The most common way is to jog the green laser pointer to the desired position and press the Set button. The machine will use it as the work offset.

Nozzle center

Especially in the situation when the machine already positioned the nozzle to the zero point this option might be useful. The machine will use the nozzle center as the work offset.

Manual

In special operations or if you work with fixtures this option will give you a possibility to set the work offset manually.

2-point edge detection

This option is useful when you need to set the work offset on the edge of the material. The machine will ask you to jog the nozzle to the first point and automatically determine the corner of the sheet. This function is fast and geared to small parts to be placed on one corner of the sheet.

The accuracy of the 2-point strategy is limited by the accuracy of the machine and therefore not to be used on a full sheet to be cut.

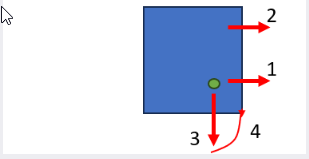
The logic works as follows:

2pt

  1. You select with the laser a position close to the desired zero position.

  2. The machine does a corner search in X direction from the position where you started.

  3. The machine does a corner search on the closest center between two slats. This will maximize a accurate corner measuring.

  4. The machine goes to the corner it found and cuts the part after confirmation.

3-point edge detection

The 3 point method is much more accurate and takes 3 measurement points on a full sheet. It assumes we have a full sheet (>1000x2000) on the table and does three corner searches at x300, x1500 and y300 to find the zero point. It is the preferred method to cut a full sheet.
3pt

If the edge detection is performed on top of a slat it will produce inaccurate results. Therefore the machine picks automatically a position between two slats.
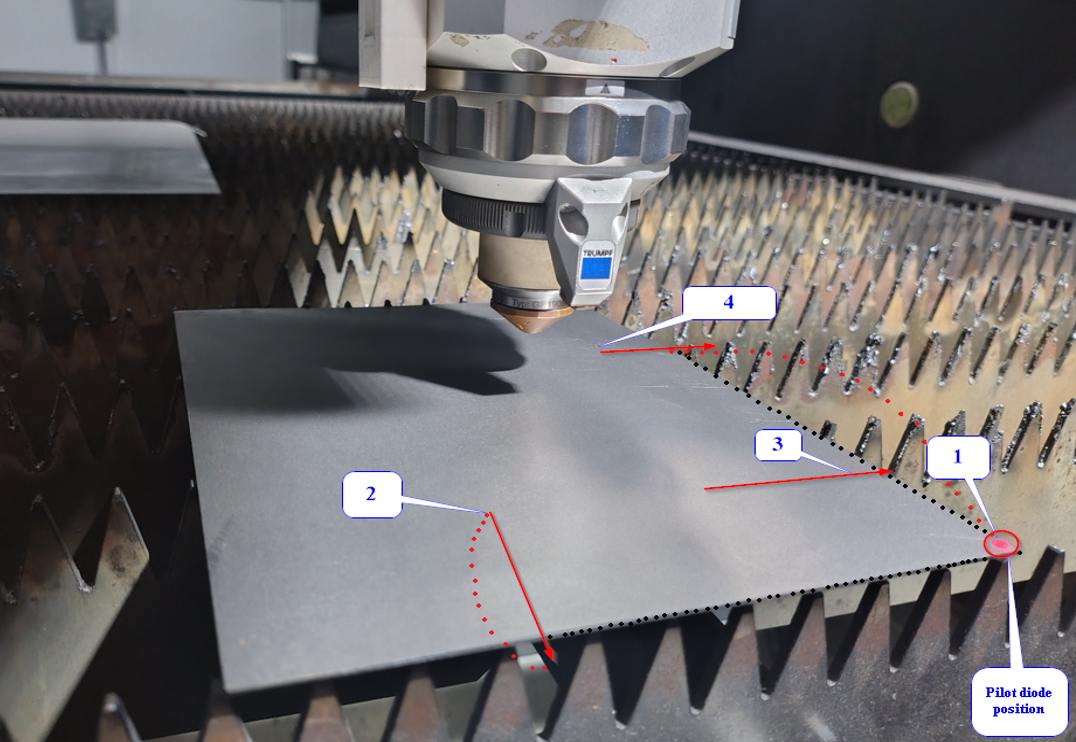
Before applying three-point edge detection in the laser machine, the sheet size must be specified in the Flux software. Ensure that the sheet size specified in the program matches the actual sheet loaded in the machine, Make sure that pilot diode is placed in the corner of the sheet
3point

Selecting the 3-point Edge Detection in the work offset menu, the following operation will be carried out:

  1. First, move the cutting head to the pilot diode at the (0,0) position on the sheet edge.

  2. The cutting head will move to this position to find the first edge of the sheet.

  3. After detecting the first edge in, the cutting head will then move to the second position to find the second edge of the sheet.

  4. After detecting the second edge, the cutting head will find the third edge of the sheet (to find the slope of the sheet).

  5. Upon confirmation, the head position will automatically move to the start position and executes the cutting process.

Contents

  • Position diode
  • Nozzle center
  • Manual
  • 2-point edge detection
  • 3-point edge detection
Simulation run Run

      Copyright © 2025 TRUMPF Metamation. All rights reserved.

    Compiled by Bento